If you have someone in your organization that is very good working with wood, this is the cheapest overall option. If you choose to go this route, you need to have some good plans and some pointers on how to put it together.
Important Considerations:
Before getting into the track plans, when building a track, certainly price is a consideration, but there are some other things to keep in mind.
- Type of Track Used at the Next Level - Some organizations have district, regional, council, state and even national races, so it is important to know what type of track they use before you buy a track for a local race. You may put your racers at a disadvantage at the next level if your track is not similar. Differences in track material, length, and type of lane guides can make a big difference in a car's performance. A car that had its design optimized for racing on the local track may end up running poorly on a different type of track.
- Number of Lanes - Most tracks are 4 lanes, followed by 3 lane tracks. Cost is a big factor, as the more lanes you get, the more expensive the track. But also, with more lanes your race will take longer since you have more cars to stage at the start line and retrieve from the finish line.
- Lane Guides - Tracks have either center or edge guides to keep cars in their lane. With the center guides, the car straddles the guide. Any low hanging weights may cause a problem with this type of lane guide, so you will need to have a underbody clearance check in your rules. With edge guides, low hanging weights are not an issue, but they may not be as effective in keeping a car in its lane. If you want to be able to use your track at an upper level race, having an edge guide track may be a problem since the vast majority of tracks are center guide.
- Length - Tracks start at 32 ft in length and go up from there, usually in 7 or 8 ft increments. A longer track will be more expensive, of course, but it may be necessary to get a longer track due to how fast the track surface is to run on. If you use aluminum plating or a plastic laminate, you need more length (around 40 to 42 ft at a minimum). The cars run faster and need more distance to slow down, so they are not crashing to a stop or going off the end of the track. However, you don't want to get too long of a track; otherwise, the slowest cars likely will not finish at all. You also need to make sure the room you will hold the race will be able to accommodate the track's length.
- Durability - Materials like MDF and particle board, while cheaper, are more prone to damage so are not a good choice for the track surface. However, many people have used MDF for the lane guides without problem.
- Start Gate - When using a timer, for timing consistency, it is important that the start gate be one that requires as little human interaction as possible. It should snap open with with the release of some lever or catch. The speed of the gate opening should not depend on the operator; otherwise, cars may be restricted in their start by a slow opening gate yet the timer has already started.
- Stop Section - A good stop section will stop the car without damaging it. I do not recommend stop sections that "trap" the cars or use foam to slow them, as these are much more likely to knock things off a car or even change the wheel alignment. Stop sections that slow the cars via "belly rubbing" are better choices.
- Storage - A track is a big investment, so it is important that you can protect the track during storage. It is a good idea to build a storage crate for it. A track is far more likely to be damaged or have pieces get lost if not stored and transported inside a crate. Tracks should be stored where they are not being exposed to sunlight, moisture or extremes in temperature.
- Transport - People usually build tracks in 8 ft lengths, because of the typical plywood dimensions. However, loading a 8 ft long track into a mini-van or short bed truck may be a problem. If you build in 7 ft or shorter lengths, transporting and storage is easier. You do want to minimize the number of track joints, though. Also, a track can be quite heavy to move in a storage crate, so it helps to get a mover's dolly to roll it around with.
Track Plans:
For our first track, we used the plans out of the Official Awana Grand Prix "How-To" Book, but there is no way to keep the track sections properly aligned, causing problems with cars jumping the track. Our new track was based on a combination of several plans, some of which are listed below, and is far better than our first.
- Grand Prix Track Plans - By Doug Lotz. A nice set of plans with lots of photos and drawings.
- Pinewood Derby Supersite's Four Lane Track Plans - A great set of plans and instructions that continues to be refined. Also shows examples of alternative ways to join track sections and how to stop the cars at the end of the track.
- Pine Car Derby 3 Lane Track Plans - Simple 3 lane track plans.
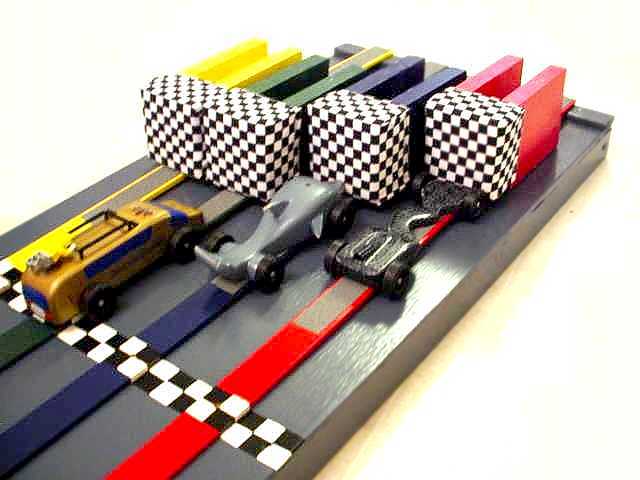
- Grand Prix Racing's Ballistic Stoppers - Have a problem with cars jumping the end of the track, dropping weights, or bouncing out of their lanes? This is a great alternative to typical stopping methods. When a car hits the foam pad on the stopper, the stopper is pushed to the end of track, slowing the car down within a very few inches, and making for a more gentle stop. Photos of our ballistic stoppers are shown in the section below.
Building Tips:
- Start Early - Allow plenty of time prior to the race to build, test and finish the track. You will not be satisfied with the results if you have to rush to get the track put together at the last minute.
- Use Quality Materials - If you want your track to last a good long time, without warping, delaminating or just plain falling apart, then don't go with the cheapest materials. Get some decent plywood with one nice smooth surface and lumber not so likely to warp, like fir. Some people have used melamine board for the track surface, but this can have brittle edges and is not so flexible for the curved sections, so I don't recommend it.
- On a Tight Budget? - Since you want good materials for your track but may not have the money to get them, so why not try to get some or all of the materials donated. With some good salesmanship, this can be done. We were able to get all of the paint and polyurethane donated by a local hardware store and the plywood donated by a carpenter in our church.
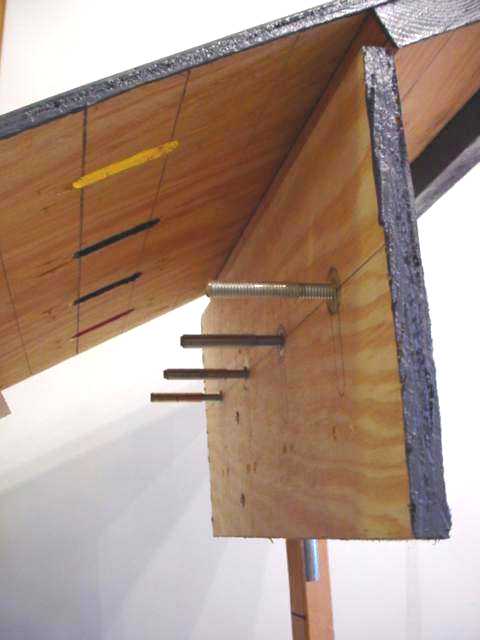
- Track Section Alignment - This was the biggest problem on our old track, since the sections were not easily aligned and would not stay aligned through the course of the race, causing cars to jump the track. Our new track uses plywood plates which bolt to the joints and does a good job of keeping the sections aligned. Below is a section with the plate shown attached. The metal strip is a nailing strap that was glued to the plywood and helps ensure that the sections will lay flat all the way across the joint. To aid in setup, the plate ends are numbered to correspond to the track section end that they connect to.
Click on the photo to enlarge
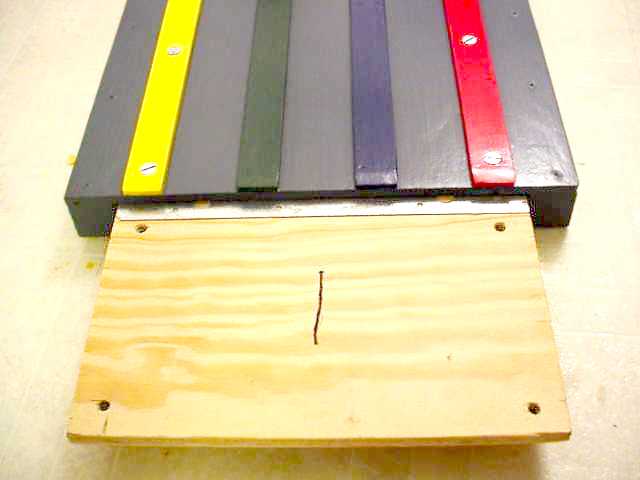
- Lane Strips(1) - Taper the uphill end of each of the lane strips, both top and sides, so a slight lateral misalignment in the sections will not cause a tire to catch and have the car jump the track. To attach the strips straight and parallel, first lay all of the sections end-to-end and use a chalk line to mark the first strip position. Measure from this reference line to mark the other lines.
- Lane Strips(2) - An alternative idea to wood strips, is to find a local company that deals with plastic sheeting and get semi-flexible plastic strips cut. This will give you nice straight lane strips and you won't even have to finish them. If you are with an Awana club, you may even try to get plastic strips in the 4 different Awana colors.
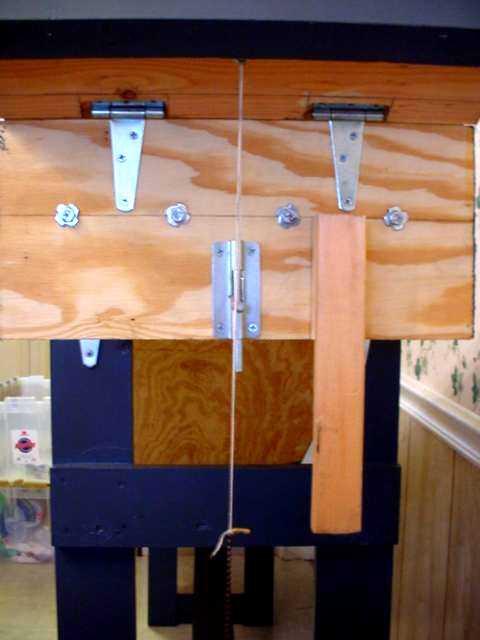
- Start Gate - Most of the plans that I have seen have pretty light-weight gates, which may require some added means to spring the gate down quickly. Our start gate is from the Awana plans and is a 5/8" plywood plate, the width of the track and about 7 inches long. This gives it some weight so it drops quickly on its own. For starting pins, we used 3" bolts, covered with some plastic shrink tubing. The bolts thread through tap-in sockets, but it may be easier for you to slot the holes, to allow room for aligning them all together, and lock them in place with nuts and lock washers. The piece of 1x2 shown below is used to hold the start gate switch closed for the timing system.
Click on a photo to enlarge
 |
 |
 |
- Finishing - A smooth surface is a fast surface, so polyurethane is a must if you cannot afford prefinished materials like plastic laminate. The value of good plywood will be appreciated at this point, but you may still have to fill some holes and do some sanding. I recommend finishing the lane strips separately from the track, which saves a lot of hassle in masking off and only requires some touch up once attached.
- Stopping the Cars - Our new track is pretty fast, and with a short stopping section, using raised lane strips and non-slip strips for extra friction were just not enough to keep the cars from crashing to a stop. I built some ballistic stoppers, as mentioned in the Track Plans section, and I was surprised at just how well they work. I considered other stopping methods, but they would either smother the car to a stop, possibly breaking parts off the car, or would have required too much track modification. Below shows some detail of the stoppers. The foam pads were covered with some cloth to add some extra racing flair. Felt was added to the bottom skids to protect the track finish from getting scratched up, but the center felt adds extra friction for stopping by dragging across the non-slip lane strips.
Click on a photo to enlarge
 |
 |
 |
 |